How to Issue a Cheque In CSI Post Office?
In this article I’m going to explain cheque issue procedure within the office for any kind of payments (RD closure, PPF withdrawal, NSC/KVP discharge, PLI maturity payment etc). Head post offices or LSG offices are eligible for issuing cheque for these kinds of payments.
For example, when a customer comes for RD closure and he demands for cheque instead of crediting to his SB account in the same post office then, the Postal Assistants in the counter will create a cheque request in SAP module as I have explained in previous article. The Treasurer will issue the cheque for respective payment.
How to issue a cheque in SAP?
Go to SAP module, Type T-code F-58
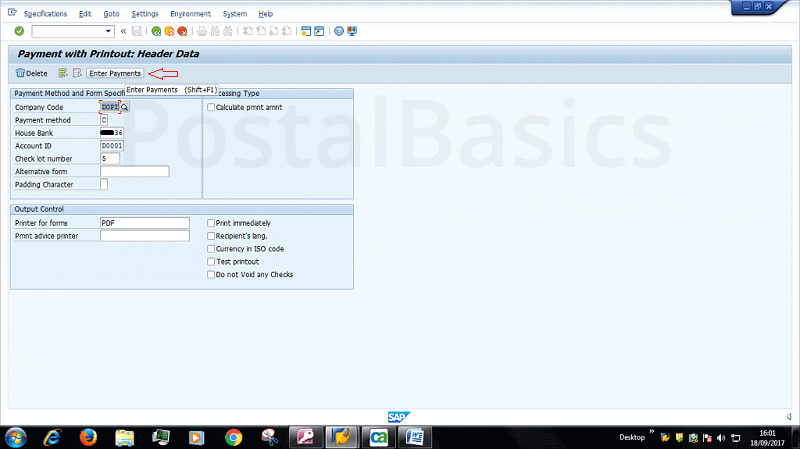 Company code DOPI
Payment method C (cheque)
House Bank AP001 (Enter bank house no. allotted to your office)
Account ID D001
Check lot number 001(as new cheque book is added to system, it will increase by one eg.002, 003,004,005)
Printer for forms PDF
Now, click on Enter Payments on the top of the window. You will redirected to below window.
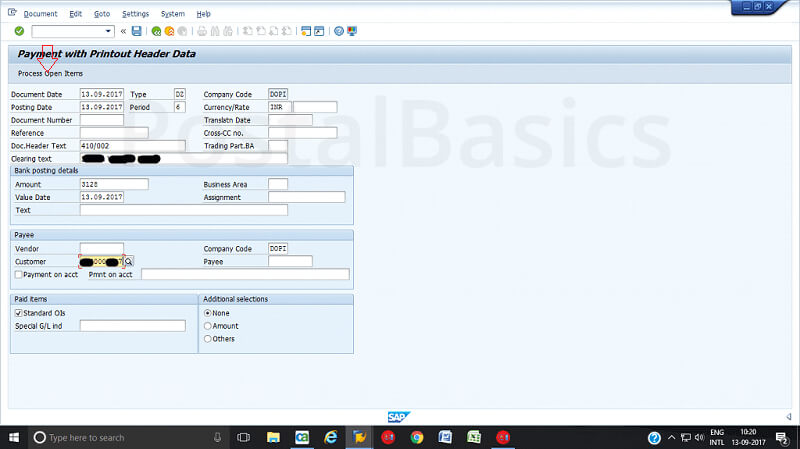
Enter the following details.
Document Date Current date
Type DZ (customer payment)
Company code DOPI
Period 6(current month)
Currency Inr
Clearing text Type related to transaction or a/c no.
Ammount 45176
Customer One time customer number (Eg.1000000294)
Now, click on Process open item, the following screen will appear.
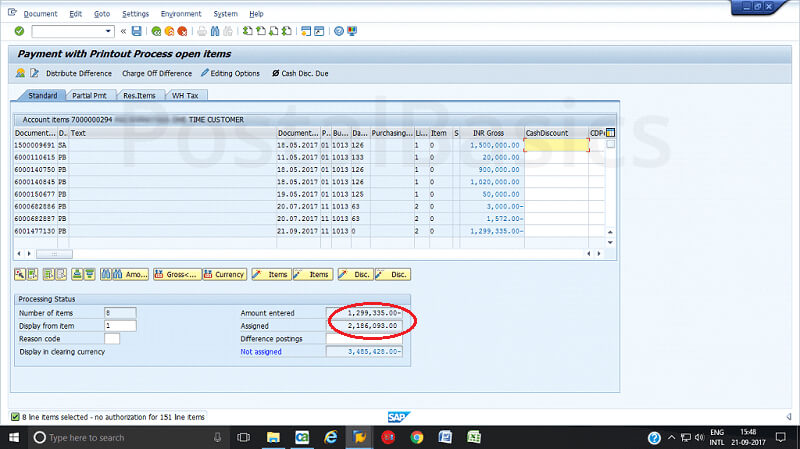
- Here, the entered amount and assigned amount should be same. For that, you have to follow these steps.
- First click on select all (3rd icon), Next, click on de-active items as shown in figure.
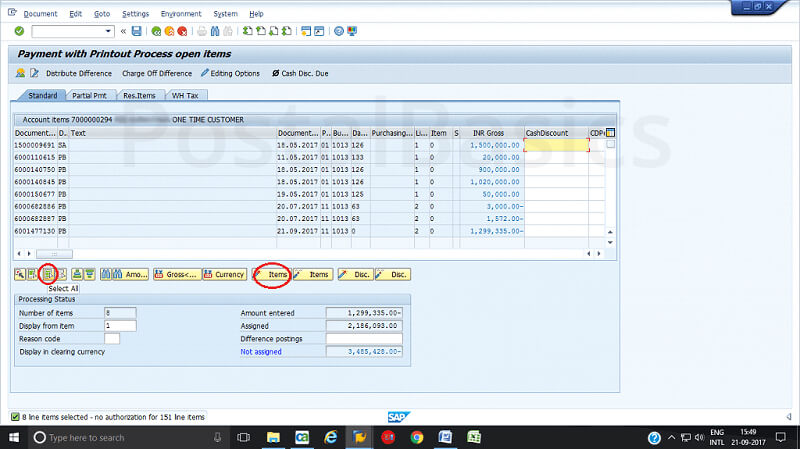
Now, the assigned amount will be zero. Here is a screenshot depicting the same.
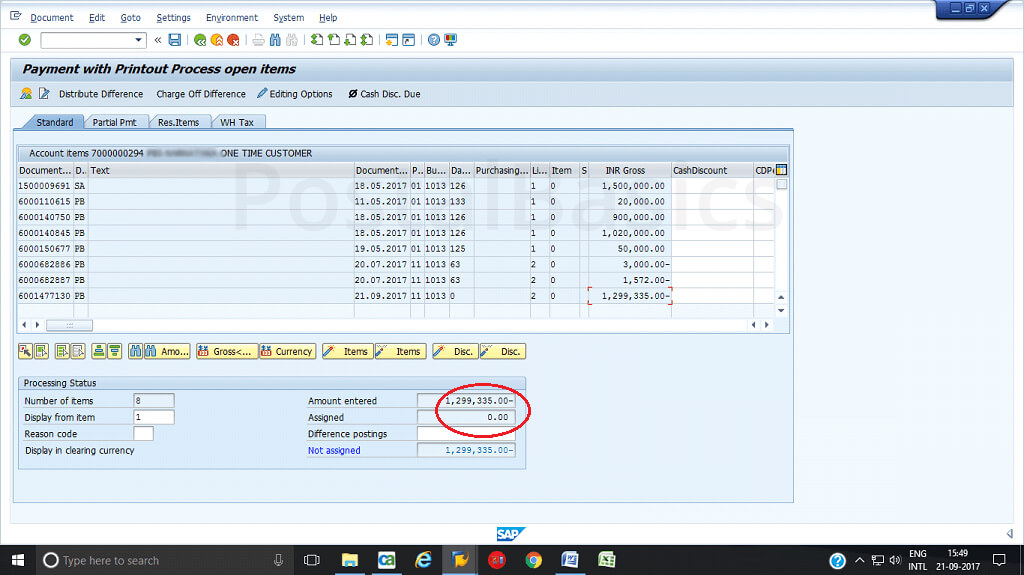
Now, you should select the amount from the list so that it will tally with the amount which is entered. See the below screen where both amounts are equal.
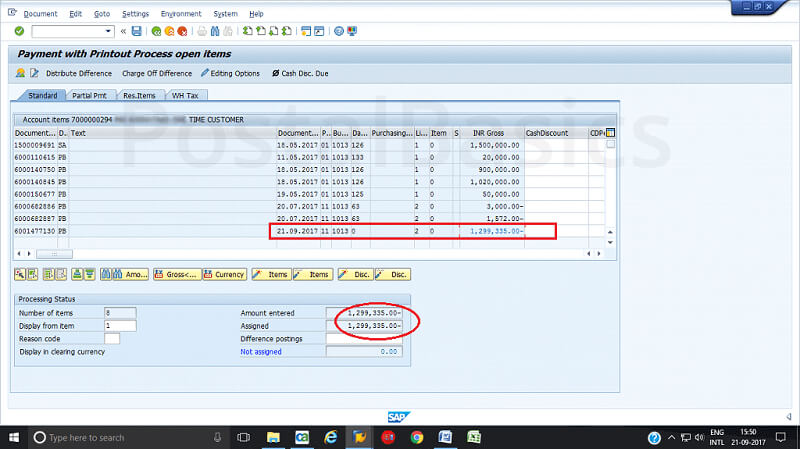
- Once you have confirmed the amount, click on Document » Simulate
- You will see this screen.
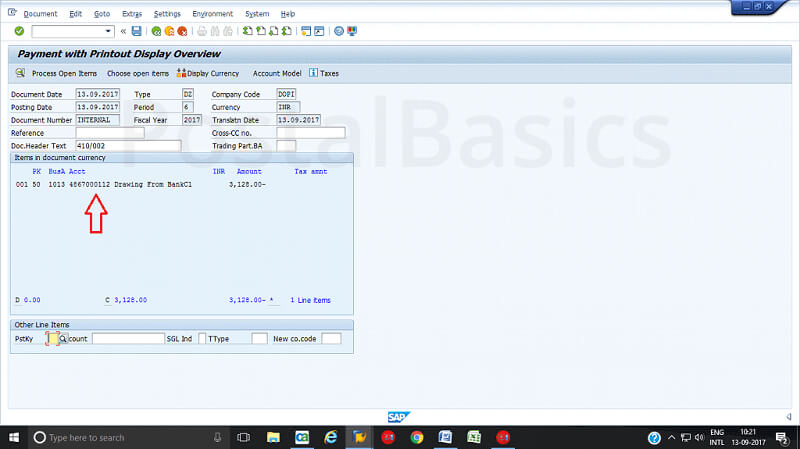
In this window, you will see only one entry on the screen that is drawing from bank. In order to complete the work, click on that credit entry. You will see this pop up.
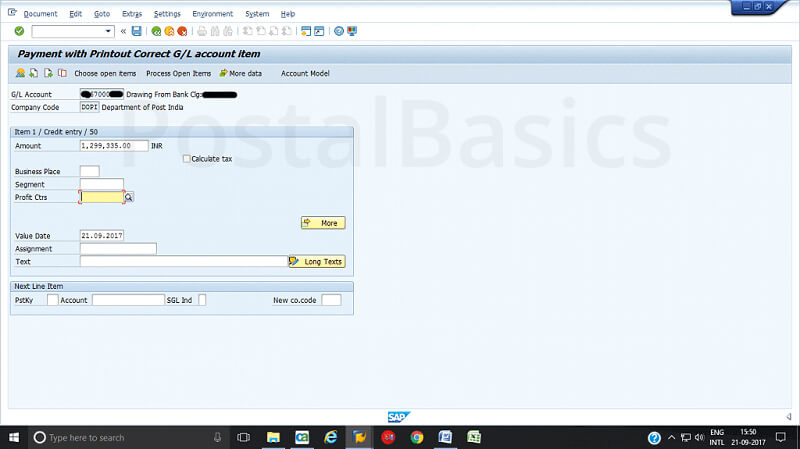
Here, enter the profit center number of you office. Then click on Document » Simulate. The following window will appear.
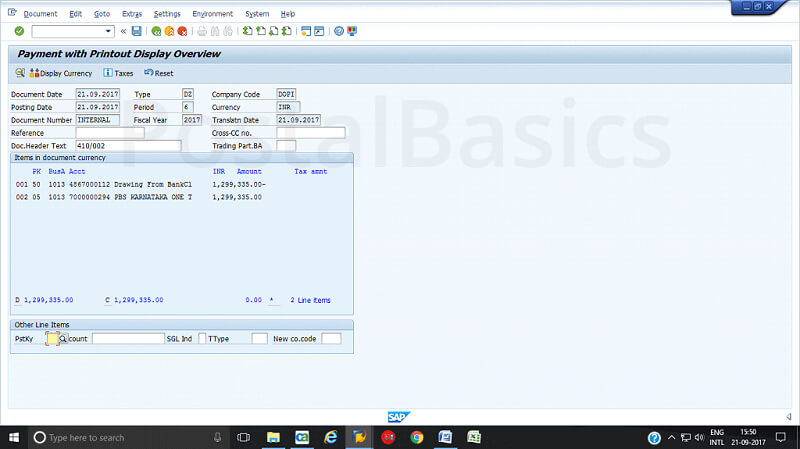
Click on save. Now, a document will be generated. Click on ✓ mark. A new window will pop up.
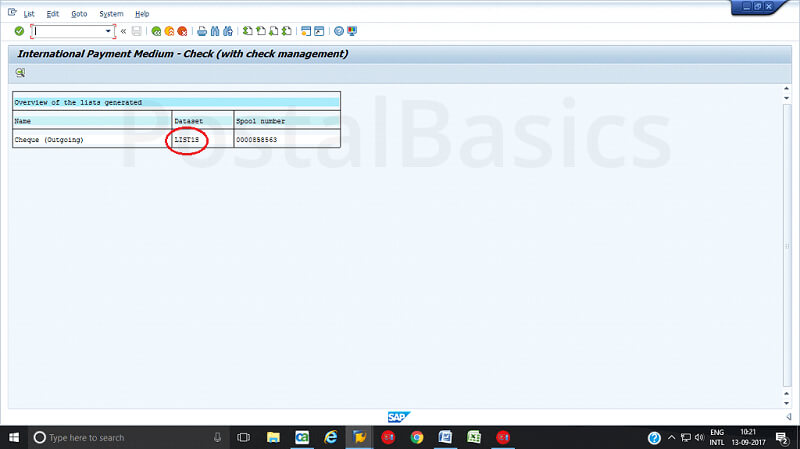
Click on Lists. The below screen will appear.
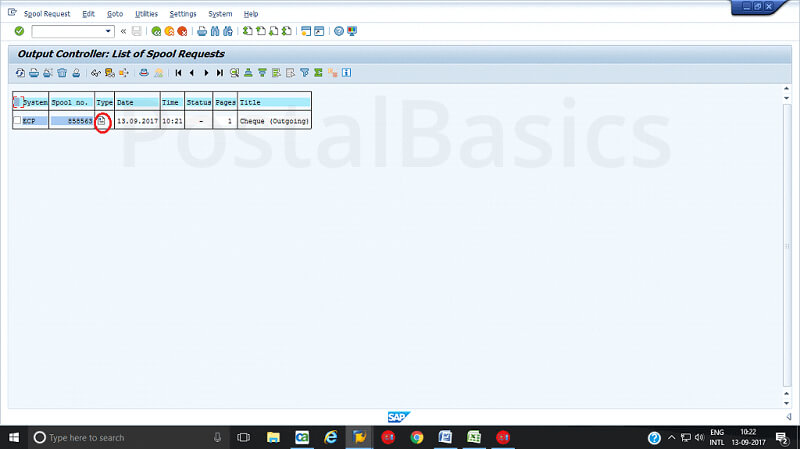
Click on the document icon. Now this screen will appear.
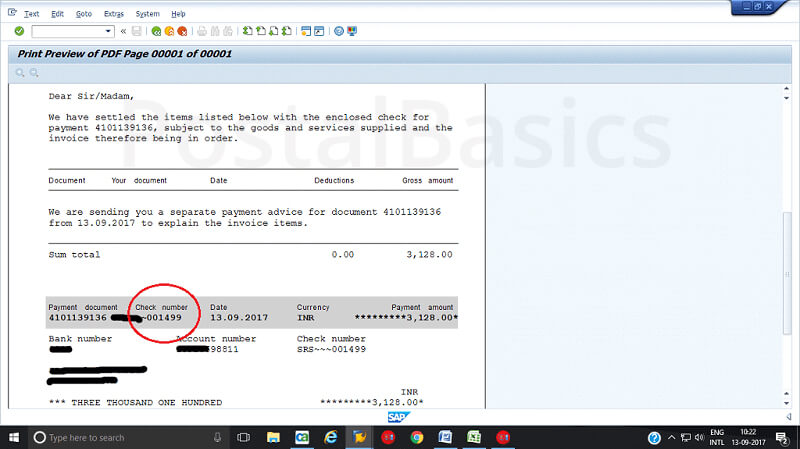
It is for the confirmation of cheque number used for this payment.
In this article I’m going to explain cheque issue procedure within the office for any kind of payments (RD closure, PPF withdrawal, NSC/KVP discharge, PLI maturity payment etc). Head post offices or LSG offices are eligible for issuing cheque for these kinds of payments.
For example, when a customer comes for RD closure and he demands for cheque instead of crediting to his SB account in the same post office then, the Postal Assistants in the counter will create a cheque request in SAP module as I have explained in previous article. The Treasurer will issue the cheque for respective payment.
How to issue a cheque in SAP?
Go to SAP module, Type T-code F-58

Company code DOPI
Payment method C (cheque)
House Bank AP001 (Enter bank house no. allotted to your office)
Account ID D001
Check lot number 001(as new cheque book is added to system, it will increase by one eg.002, 003,004,005)
Printer for forms PDF
Now, click on Enter Payments on the top of the window. You will redirected to below window.

Enter the following details.
Document Date Current date
Type DZ (customer payment)
Company code DOPI
Period 6(current month)
Currency Inr
Clearing text Type related to transaction or a/c no.
Ammount 45176
Customer One time customer number (Eg.1000000294)
Now, click on Process open item, the following screen will appear.

- Here, the entered amount and assigned amount should be same. For that, you have to follow these steps.
- First click on select all (3rd icon), Next, click on de-active items as shown in figure.

Now, the assigned amount will be zero. Here is a screenshot depicting the same.

Now, you should select the amount from the list so that it will tally with the amount which is entered. See the below screen where both amounts are equal.

- Once you have confirmed the amount, click on Document » Simulate
- You will see this screen.

In this window, you will see only one entry on the screen that is drawing from bank. In order to complete the work, click on that credit entry. You will see this pop up.

Here, enter the profit center number of you office. Then click on Document » Simulate. The following window will appear.

Click on save. Now, a document will be generated. Click on ✓ mark. A new window will pop up.

Click on Lists. The below screen will appear.

Click on the document icon. Now this screen will appear.

It is for the confirmation of cheque number used for this payment.


0 on: "How to Issue a Cheque In CSI Post Office? In this article I’m going to explain cheque issue procedure within the office for any kind of payments (RD closure, PPF withdrawal, NSC/KVP discharge, PLI maturity payment etc). Head post offices or LSG offices are eligible for issuing cheque for these kinds of payments. For example, when a customer comes for RD closure and he demands for cheque instead of crediting to his SB account in the same post office then, the Postal Assistants in the counter will create a cheque request in SAP module as I have explained in previous article. The Treasurer will issue the cheque for respective payment. How to issue a cheque in SAP? Go to SAP module, Type T-code F-58 Company code DOPI Payment method C (cheque) House Bank AP001 (Enter bank house no. allotted to your office) Account ID D001 Check lot number 001(as new cheque book is added to system, it will increase by one eg.002, 003,004,005) Printer for forms PDF Now, click on Enter Payments on the top of the window. You will redirected to below window. Enter the following details. Document Date Current date Type DZ (customer payment) Company code DOPI Period 6(current month) Currency Inr Clearing text Type related to transaction or a/c no. Ammount 45176 Customer One time customer number (Eg.1000000294) Now, click on Process open item, the following screen will appear. Here, the entered amount and assigned amount should be same. For that, you have to follow these steps. First click on select all (3rd icon), Next, click on de-active items as shown in figure. Now, the assigned amount will be zero. Here is a screenshot depicting the same. Now, you should select the amount from the list so that it will tally with the amount which is entered. See the below screen where both amounts are equal. Once you have confirmed the amount, click on Document » Simulate You will see this screen. In this window, you will see only one entry on the screen that is drawing from bank. In order to complete the work, click on that credit entry. You will see this pop up. Here, enter the profit center number of you office. Then click on Document » Simulate. The following window will appear. Click on save. Now, a document will be generated. Click on ✓ mark. A new window will pop up. Click on Lists. The below screen will appear. Click on the document icon. Now this screen will appear. It is for the confirmation of cheque number used for this payment."